Physical Address
304 North Cardinal St.
Dorchester Center, MA 02124
Physical Address
304 North Cardinal St.
Dorchester Center, MA 02124
Are you struggling to turn on your Thinkpad docking station? This article will guide you through the process step by step.
First, check the power connection to ensure it’s properly plugged in.
Then, locate the power button and press it firmly. Confirm that the power indicator light is on.
Next, connect your laptop to the docking station.
Finally, test the connectivity of your peripherals.
If you encounter any issues, we’ll provide troubleshooting tips to help you out.
Let’s get started!
To check the power connection of your Thinkpad Docking Station, simply ensure that the power cable is securely plugged into both the docking station and the power outlet. This is a crucial step to ensure that your docking station receives the necessary power to function properly.
Begin by locating the power cable that came with your docking station. It’s usually a black cable with a rectangular plug on one end and a standard three-pronged plug on the other end. Take a moment to inspect the cable for any damage or fraying. If you notice any issues, it’s recommended to replace the cable to avoid any potential hazards.
Next, connect the rectangular plug into the corresponding power input port on the back of your docking station. This port is typically labeled with a power symbol or the word ‘Power.’ Make sure the plug fits securely into the port and is inserted fully.
Now, locate a nearby power outlet and plug the other end of the power cable into it. Ensure that the plug is fully inserted and that it isn’t loose. You may also want to double-check that the power outlet itself is functioning properly by plugging in another device to confirm it’s receiving power.
Once you have confirmed that the power cable is securely plugged into both the docking station and the power outlet, you can proceed to turn on your Thinkpad Docking Station.
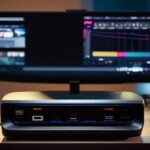
Now, locate the power button on your Thinkpad Docking Station.
The power button is an essential component that allows you to turn on and off your docking station. To help you find it quickly and easily, follow these steps:
Look for the power symbol: On most Thinkpad Docking Stations, the power button is typically marked with the universal power symbol, which resembles a circle with a vertical line in the middle. Scan the front or top of your docking station for this symbol.
Check the front panel: In many models, the power button is conveniently located on the front panel of the docking station. Scan the front panel and look for a small button with the power symbol next to it. This is likely to be your power button.
Examine the sides: In some Thinkpad Docking Station models, the power button may be located on one of the sides. Carefully inspect the sides of your docking station for a button with the power symbol. It might be on the left or right side, depending on the specific model.
Refer to the user manual: If you’re still unable to locate the power button, consult the user manual that came with your Thinkpad Docking Station. The manual will provide detailed instructions and illustrations to guide you in finding the power button.
Now that you have located the power button on your Thinkpad docking station, it’s time to press it to turn on the device. Before doing so, it’s important to understand the compatibility of your docking station with your Thinkpad model.
Additionally, knowing the exact location of the power button will help you avoid any confusion or delays in powering up your docking station.
You can easily activate the Thinkpad docking station by pressing the power button. However, it’s important to ensure that your docking station is compatible with your Thinkpad model.
Here are some key considerations to keep in mind regarding docking station compatibility:
Model Compatibility: Check if your docking station is specifically designed for your Thinkpad model. Different models may have different docking station requirements.
Power Requirements: Verify that your docking station can provide enough power to support your Thinkpad’s needs. Insufficient power supply may result in performance issues or device malfunction.
Connectivity Options: Ensure that your docking station offers the necessary connectivity options for your peripherals. Check for the presence of ports such as USB, HDMI, Ethernet, and audio jacks.
Driver Compatibility: Confirm that your Thinkpad’s drivers are compatible with the docking station. Outdated or incompatible drivers may prevent proper functioning of the docking station.
To activate the Thinkpad docking station, simply press the power button located on the device. The power button is conveniently positioned on the front panel, allowing easy access and quick activation. Once pressed, the docking station will power on, and you can begin using it with your Thinkpad laptop.
To provide a visual representation of the power button location, here is a table that illustrates the different Thinkpad docking station models and their respective power button locations:
| Docking Station Model | Power Button Location |
|---|---|
| Thinkpad Pro Dock | Front Panel |
| Thinkpad Ultra Dock | Front Panel |
| Thinkpad Basic Dock | Front Panel |
If experiencing any common issues with your Thinkpad docking station, try pressing the power button to resolve them.
Here are some common problems you might encounter and how pressing the power button can help:
Docking station not turning on: If the docking station is unresponsive, pressing the power button can help reset it and bring it back to life.
Connected devices not working: Sometimes, the docking station mightn’t recognize the connected devices properly. Pressing the power button can help refresh the connection and get them working again.
Display issues: If you’re having trouble with the external display connected to the docking station, pressing the power button can help resolve any issues with the display output.
Audio problems: If the audio output from the docking station isn’t working correctly, pressing the power button can help reset the audio settings and restore normal functionality.
Checking the power indicator light is essential to ensure the Thinkpad Docking Station is receiving power. The power indicator light is located on the docking station itself and serves as a visual cue to confirm that the docking station is properly connected and functioning.
When the power indicator light is on, it indicates that the docking station is receiving power and is ready to be used.
To confirm the power indicator light, first, make sure that the docking station is securely connected to a power source. Ensure that the power cable is properly plugged into both the docking station and a working electrical outlet. Once the power connection is established, look for the power indicator light on the docking station. It’s usually located on the front or side of the docking station and may be labeled as ‘Power’ or indicated by a small light bulb icon.
When the power indicator light is on, it means that the docking station is receiving power and is ready for use. If the power indicator light is off or blinking, it suggests that there may be an issue with the power supply. In such cases, double-check the power connection and ensure that the power cable isn’t damaged.
Confirming the power indicator light is an important step in troubleshooting any power-related issues with the Thinkpad Docking Station. By ensuring that the power indicator light is on, you can be confident that the docking station is receiving the necessary power supply and is ready to enhance your productivity.
To connect your laptop to a docking station, first ensure that the docking station is compatible with your laptop model.
Then, gather all the necessary cables and peripherals you want to connect, such as monitors, keyboard, and mouse.
Before connecting your laptop to the Thinkpad docking station, ensure compatibility by checking the model specifications. Here are four important things to consider:
Physical Connection: Make sure your laptop has the necessary ports to connect to the docking station. Check if your laptop has a compatible docking connector or if you need an adapter.
Power Requirements: Verify that the docking station can provide enough power to charge your laptop. Some docking stations have limited power output, which may not be sufficient for certain laptops.
Operating System Compatibility: Ensure that the docking station is compatible with your laptop’s operating system. Check if the drivers and software required for the docking station are available for your specific OS.
Additional Features: Consider what additional features you need from the docking station, such as extra USB ports, display outputs, or audio jacks. Check if the docking station provides these features and if they meet your requirements.
To connect multiple peripherals, simply plug your laptop into the Thinkpad docking station. The docking station provides a convenient way to connect your laptop to various devices and accessories. It eliminates the hassle of connecting and disconnecting multiple cables every time you need to use your laptop at a desk setup.
Once connected, the docking station allows you to easily access additional ports and features without the need for extra cables or adapters. You can connect your laptop to external monitors, keyboards, mice, printers, and other devices, expanding your workstation’s capabilities.
The Thinkpad docking station also provides power to your laptop, so you won’t have to worry about battery life while working at your desk. With a simple plug-and-play process, connecting multiple peripherals becomes effortless and efficient.
Make sure all your peripherals are properly connected and functioning by testing their connectivity on the Thinkpad docking station. To ensure that everything is working as it should, follow these steps:
Check the power:
Test the connections:
Verify device recognition:
Test functionality:
Having trouble with your Thinkpad docking station? Don’t worry, troubleshooting the issue doesn’t have to be a daunting task. Here are some tips to help you identify and resolve common problems with your docking station.
Firstly, ensure that all cables are securely connected. Check the power cable, USB cables, and any other connections between the docking station and your computer or peripherals. Sometimes, loose connections can cause the docking station to malfunction.
If the docking station isn’t powering on, verify that it’s receiving power. Check the power outlet and make sure it’s working properly. If the outlet is functioning correctly, try using a different power cable or adapter to rule out any issues with the power supply.
Another troubleshooting step is to update the docking station’s firmware. Visit the manufacturer’s website and download the latest firmware for your specific docking station model. Follow the instructions provided to update the firmware, as this can often resolve compatibility issues and improve overall performance.
If you’re experiencing issues with specific peripherals, such as monitors or USB devices, try connecting them directly to your computer to determine if the problem lies with the docking station or the peripheral itself. Additionally, check for any driver updates for your peripherals as outdated drivers can cause compatibility issues.
Lastly, consider performing a reset of the docking station. Disconnect all peripherals and power down the docking station. Press and hold the reset button, usually located on the back or bottom of the docking station, for about 10 seconds. Release the button and then reconnect and power on the docking station.
To determine if your Thinkpad docking station is compatible with your laptop model, you can check the specifications of both devices. Look for the specific docking station model and compare it with the supported laptop models listed on Lenovo’s website or in the product documentation.
Additionally, you can consult the user manual or contact Lenovo support for further assistance. It’s important to ensure compatibility for a seamless docking experience.
Yes, you can connect multiple monitors to your Thinkpad docking station. It provides multiple video ports for you to connect additional monitors.
Simply plug in the monitors to the available video ports on the docking station, and your laptop will recognize them.
This allows you to extend your display across multiple monitors, increasing your productivity and giving you more screen real estate to work with.
Yes, it’s possible to charge your laptop through the docking station. The Thinkpad docking station is designed to provide power to your laptop while it’s connected.
Simply plug your laptop into the docking station, and it will start charging automatically. This is a convenient feature that allows you to keep your laptop powered up without having to use a separate charger.
If your laptop isn’t detecting the docking station, there are a few steps you can take to troubleshoot the issue.
First, make sure the docking station is securely connected to your laptop. Check all the cables and connectors for any damage or loose connections.
Restart your laptop and try reconnecting the docking station again.
If the issue persists, check for any driver updates for your docking station on the manufacturer’s website. Updating the drivers may resolve the detection issue.
To ensure your Thinkpad docking station works properly, it’s important to install the necessary drivers and software. These drivers and software are specifically designed to enable seamless communication between your laptop and the docking station.
To conclude, turning on a ThinkPad docking station is a simple process.
Connect your laptop to the docking station and test the connectivity of peripherals.
If you encounter any issues, refer to the troubleshooting tips.
Following these steps will enable you to efficiently use your docking station for enhanced productivity.