Physical Address
304 North Cardinal St.
Dorchester Center, MA 02124
Physical Address
304 North Cardinal St.
Dorchester Center, MA 02124
Are you ready to unlock the full potential of your Nintendo Switch?
In this guide, we’ll show you how to use the Nintendo Switch docking station to seamlessly switch between handheld and TV modes.
From unboxing to troubleshooting, we’ll cover everything you need to know to make the most out of your gaming experience.
Get ready to level up and discover the convenience and versatility of the Nintendo Switch docking station.
Let’s dive in!
When you unbox the Nintendo Switch Dock, you’ll find all the necessary components to set up your gaming console. The dock itself is a sleek and compact device that serves as the central hub for your Nintendo Switch. It’s made of high-quality plastic and has a matte finish, giving it a modern and sophisticated look.
Inside the box, you’ll find the dock, an HDMI cable, and an AC adapter. The dock is the main component that allows you to connect your Nintendo Switch to a TV or monitor. It has a slot in the middle where you can securely place your Switch console. The HDMI cable is used to connect the dock to your TV or monitor, ensuring that you can enjoy your games on a larger screen. The AC adapter is used to provide power to the dock, so make sure to connect it to a power outlet.
Setting up the Nintendo Switch Dock is a breeze. Simply connect one end of the HDMI cable to the HDMI port on the dock and the other end to the HDMI port on your TV or monitor. Then, connect the AC adapter to the dock and plug it into a power outlet. Finally, carefully place your Nintendo Switch console into the slot on the dock, making sure it’s firmly seated.
Now that you have unboxed and set up your Nintendo Switch Dock, you’re ready to enjoy your favorite games on the big screen. Get ready for an immersive gaming experience like no other!
To connect the dock to your TV, you’ll need to follow a few simple steps.
First, locate the HDMI cable that came with your Nintendo Switch. This cable will be used to connect the dock to your TV.
Next, find the HDMI port on the back of your TV and insert one end of the HDMI cable into it. Make sure to remember which HDMI port you used, as you’ll need to select the corresponding input on your TV later.
After connecting the HDMI cable to your TV, take the other end and insert it into the HDMI port on the back of the dock. The HDMI port on the dock is labeled ‘HDMI OUT.’ Ensure that the cable is securely connected to both the TV and the dock.
Once the HDMI cable is connected, locate the AC adapter that also came with your Nintendo Switch. Plug one end of the AC adapter into the AC adapter port on the back of the dock, labeled ‘AC ADAPTER.’ Then, plug the other end into a power outlet.
Finally, turn on your TV and use the remote to select the correct HDMI input that you connected the dock to. This is typically done by pressing the ‘Input’ or ‘Source’ button on your remote and choosing the corresponding HDMI input number. Once selected, you should see the Nintendo Switch home screen on your TV.
Congratulations! You have successfully connected the Nintendo Switch dock to your TV. Now you can enjoy playing your favorite games on the big screen.
To properly insert your Nintendo Switch console into the docking station, it’s important to ensure compatibility between the two.
The console should easily slide into the dock without any force or resistance.
It’s crucial to follow the proper insertion technique to avoid potential damage to both the console and the dock.
To insert the Nintendo Switch console into the docking station, you’ll need to align the console with the dock and gently slide it in until it clicks into place. The docking station is designed to be compatible with the Nintendo Switch console, allowing for a seamless transition from handheld to TV mode.
Here are some key points to keep in mind regarding docking station compatibility:
To properly insert your Nintendo Switch console into the docking station:
The docking station is designed to securely hold your console and provide a seamless transition from handheld to TV mode. Before inserting the console:
Once you’ve aligned the console with the dock:
It’s important to be careful and avoid applying excessive force, as this may damage the console or the dock.
Once the console is properly inserted, you can enjoy playing your favorite games on the big screen.
When inserting your Nintendo Switch console into the docking station, there are potential risks of damaging both the console and the dock if not done correctly. It’s important to be aware of these risks to ensure the longevity and functionality of your gaming system.
Here are some potential damage risks to consider:
Misalignment: If the console isn’t properly aligned with the dock, it can result in scratches, dents, or even bent pins on the connectors.
Forceful Insertion: Pushing the console into the dock with excessive force can cause damage to the USB-C port, which may lead to connectivity issues or charging problems.
Dust and Debris: If the dock isn’t kept clean, dust and debris can accumulate on the connectors, leading to poor connection and potential damage over time.
Overheating: Placing the console in the dock while it’s still hot can cause the dock to overheat, potentially damaging both the console and the dock.
Power Surges: Sudden power surges or electrical fluctuations can cause damage to the console and the dock, so it’s recommended to use a surge protector.
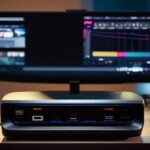
To access the ports and buttons on the Nintendo Switch Docking Station, use the console’s USB-C cable. The docking station is equipped with various ports and buttons that allow you to connect and control your Nintendo Switch. Let’s take a closer look at each of them.
Starting with the ports, the docking station has a USB 3.0 port on the side, which can be used to connect external devices such as controllers, keyboards, or storage devices. This port provides fast data transfer speeds and is backward compatible with USB 2.0 devices.
On the back of the docking station, you’ll find an HDMI port, which is used to connect your Nintendo Switch to a TV or monitor. This allows you to enjoy your games on a larger screen with better visuals. Additionally, there’s an AC adapter port, where you can plug in the power cable to charge your Nintendo Switch while it’s docked.
Moving on to the buttons, the docking station features a release button on the top. Pressing this button will release the mechanism that holds your Nintendo Switch in place, allowing you to easily remove it from the dock. This is useful if you want to switch to handheld mode or take your console on the go.
Finally, there’s a small LED indicator light on the front of the docking station. This light will turn on when your Nintendo Switch is properly docked and charging. It provides a visual confirmation that your console is connected and ready to use.
To optimize your gaming experience in docked mode on the Nintendo Switch, adjust the display settings using the console’s menu options. By customizing the display settings, you can ensure that your games look their best and are tailored to your preferences. Here are some key display settings you can adjust:
Resolution: Select the resolution that suits your preferences and the capabilities of your TV or monitor. The Nintendo Switch offers options for 720p and 1080p resolutions, allowing you to choose between a balance of performance and visual quality.
Display Mode: Choose between different display modes, such as Standard or Zoom, to adjust the size and aspect ratio of the game on your screen. This can help you achieve the optimal visual experience based on your TV or monitor’s capabilities.
Brightness: Adjust the brightness level of the display to ensure that you can see the game clearly without straining your eyes. This is especially important if you’re playing in a dark room or in bright daylight.
Color Correction: Fine-tune the color settings to enhance the visual quality of your games. You can adjust parameters such as contrast, saturation, and hue to achieve the desired color balance.
Screen Burn-in Reduction: Enable this feature to prevent static images from causing permanent damage to your TV or monitor. It automatically adjusts the display to reduce the risk of burn-in, ensuring that your gaming sessions don’t leave a lasting mark on your screen.
To charge your Nintendo Switch, simply connect it to the dock and plug in the power adapter. The dock serves as a charging station for your Switch, allowing you to conveniently charge your device while you’re not using it. Here’s how you can use the dock to charge your Nintendo Switch:
Connect your Nintendo Switch to the dock: The dock has a USB-C port on the inside where you can insert your Switch. Gently slide the Switch into the dock until it clicks into place.
Plug in the power adapter: The power adapter is included with your Nintendo Switch and is used to provide power to the dock. Connect one end of the power adapter to the dock and the other end to a power outlet. Make sure that the power adapter is securely plugged in.
Charging indicator: Once your Nintendo Switch is connected to the dock and the power adapter is plugged in, the dock’s LED indicator will light up in orange to indicate that charging is in progress. When the battery is fully charged, the LED indicator will turn off.
Here’s a table that summarizes the charging process:
| Step | Action |
|---|---|
| 1 | Connect your Nintendo Switch to the dock |
| 2 | Plug in the power adapter |
| 3 | Wait for the charging indicator on the dock to light up in orange |
| 4 | Once fully charged, the LED indicator will turn off |
Using the dock to charge your Nintendo Switch is a simple and convenient way to ensure that your device is always ready to go when you are.
To switch between handheld and docked modes on your Nintendo Switch, simply slide the console out of the dock or insert it into the dock, depending on your desired mode of play. Here are the steps to switch between the two modes:
Handheld Mode: When you want to play your Nintendo Switch on the go, slide the console out of the dock. The console will automatically switch to handheld mode, allowing you to play games on the built-in screen.
Docked Mode: If you prefer a bigger screen and a more immersive gaming experience, insert the console into the dock. Make sure the dock is connected to your TV using an HDMI cable. Once the console is docked, the game will be displayed on your TV screen, and you can play games with the Joy-Con controllers or a compatible controller.
Switching between handheld and docked modes is quick and seamless, allowing you to play your favorite games wherever and however you like. Whether you’re on the go or at home, the Nintendo Switch gives you the flexibility to adapt to your gaming preferences.
Remember, when switching between modes, make sure to save your progress in the game. You can do this by pressing the ‘+’ button on your Joy-Con controller or the ‘X’ button on your Pro Controller to access the in-game menu and select the save option.
Are you experiencing connection problems with your Nintendo Switch docking station? Don’t worry, there are solutions to help you troubleshoot and fix these issues.
Additionally, if you’re having trouble with charging, we’ve some helpful tips to get your docking station working properly again.
If you’re experiencing connection problems with your Nintendo Switch docking station, try these solutions to troubleshoot common issues:
Check the connections: Ensure that the power cable is securely plugged into both the docking station and the power outlet. Also, make sure that the HDMI cable is properly connected to the docking station and the TV.
Restart the docking station: Sometimes, a simple restart can fix connection issues. Unplug the power cable from the docking station and wait for a few seconds before plugging it back in.
Update the firmware: Check if there are any firmware updates available for your docking station. Updating the firmware can often resolve compatibility issues and improve performance.
Try a different HDMI cable: Faulty HDMI cables can cause connection problems. Try using a different HDMI cable to see if that resolves the issue.
Reset the docking station: As a last resort, you can try resetting the docking station to its factory settings. Consult the user manual or contact Nintendo support for instructions on how to do this.
To resolve charging issues with your Nintendo Switch docking station, try these troubleshooting tips.
| Issue | Troubleshooting Tip |
|---|---|
| Dock not charging the Switch | 1. Ensure the power adapter is securely plugged into the dock and a power outlet. |
| 2. Check if the power adapter is functioning properly by using it to charge other devices. | |
| 3. Try using a different power outlet to eliminate any potential issues with the current outlet. | |
| 4. If none of the above steps work, consider replacing the power adapter or contacting support. | |
| Switch not charging in handheld mode | 1. Verify that the charging cable is securely connected to both the Switch and the dock. |
| 2. Make sure the Switch is properly aligned with the USB-C connector on the dock. | |
| 3. Check if the charging cable is damaged and try using a different cable if necessary. | |
| 4. If the issue persists, contact support for further assistance. |
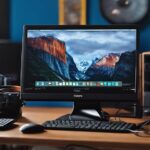
To connect your Nintendo Switch dock to a computer monitor instead of a TV, you’ll need an HDMI cable.
First, make sure the dock is plugged into a power source.
Next, connect one end of the HDMI cable to the HDMI port on the dock, and the other end to the HDMI port on your computer monitor.
Once connected, turn on the monitor and switch the input source to the HDMI channel.
Your Nintendo Switch should now be displayed on the computer monitor.
Yes, you can use a different charging cable with the Nintendo Switch dock. The dock itself has a USB-C port, which is the same type of port used by the Switch console for charging.
As long as the cable you use is compatible with USB-C and has the necessary power output, it should work with the dock. Just make sure to use a high-quality, certified cable to ensure safe and efficient charging.
Yes, it’s possible to connect multiple Nintendo Switch consoles to one docking station. The docking station has multiple USB ports, allowing you to connect multiple consoles simultaneously.
Simply plug in the HDMI cable from each console to the docking station, and connect the power cable to the dock. This way, you can easily switch between consoles and enjoy multiplayer gaming on a bigger screen.
It’s a convenient feature for gaming with friends or family.
If your Nintendo Switch dock isn’t detecting your TV, there are a few things you can try.
First, make sure that all cables are securely connected and that your TV is set to the correct input.
If that doesn’t work, try power cycling both your dock and your TV by unplugging them from the power source for a few minutes and then plugging them back in.
You can also try using a different HDMI cable or connecting your Switch directly to the TV to see if the issue lies with the dock.
Yes, you can use the Nintendo Switch dock to play games on your TV without using the Joy-Con controllers.
Once your Switch is docked and connected to the TV, you can use a Pro Controller or a compatible wired controller to play games.
Simply connect the controller to the Switch dock or pair it wirelessly, and you’ll be able to enjoy your games on the big screen without needing the Joy-Con controllers.
To conclude, the Nintendo Switch docking station is a versatile accessory that allows you to connect your console to your TV and charge it simultaneously. It provides easy access to various ports and buttons, and you can easily switch between handheld and docked modes.
By following the steps outlined in this article, you can make the most out of your Nintendo Switch docking station and enhance your gaming experience.