Physical Address
304 North Cardinal St.
Dorchester Center, MA 02124
Physical Address
304 North Cardinal St.
Dorchester Center, MA 02124
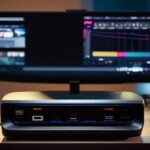
If you’re experiencing issues with your Dell D6000 docking station, resetting it may help resolve the problem.
In this guide, we’ll show you how to reset your docking station step by step.
By following these instructions, you can ensure a smooth and hassle-free reset process.
So let’s get started and get your Dell D6000 docking station back up and running in no time.
To ensure compatibility with your Dell D6000 Docking Station, you should check if it works with your specific laptop model. The Dell D6000 Docking Station is designed to work with a wide range of laptops, but it’s important to verify that your laptop is supported before making a purchase.
The first step in checking compatibility is to visit the Dell website and find the product page for the D6000 Docking Station. On the product page, you’ll find a list of compatible laptop models. This list will typically include the specific laptop models that have been tested and confirmed to work with the docking station.
If your laptop model isn’t listed on the Dell website, it doesn’t necessarily mean that it isn’t compatible. In some cases, Dell may not have tested every possible laptop model with the D6000 Docking Station. In these situations, it’s recommended to contact Dell’s customer support for further assistance. They can provide you with more information about compatibility and help determine if your laptop will work with the docking station.
Another option to check compatibility is to search online forums and communities where users discuss their experiences with the D6000 Docking Station. Many users will share their laptop models and whether or not they were able to successfully use the docking station. This can provide you with additional insight and help you make an informed decision.
Disconnect all devices from the Dell D6000 Docking Station.
Before proceeding with the reset process, it’s important to ensure that no external devices are connected to the docking station. This includes peripherals such as monitors, keyboards, mice, and USB devices. Disconnecting all devices will help prevent any potential conflicts or issues during the reset process.
To disconnect the devices, start by powering off any connected monitors and disconnecting their cables from the docking station.
Next, disconnect any USB devices, such as keyboards, mice, or external hard drives, from the docking station’s USB ports. Ensure that all cables are properly disconnected and neatly arranged for easy reconnection later.
It is also recommended to disconnect the power adapter from the docking station. This will ensure a complete power cycle and help eliminate any residual power that may be present. To disconnect the power adapter, locate the power cable connected to the docking station and unplug it from the power source.
To power off the Dell D6000 docking station, start by unplugging the power cable from the docking station.
Then, locate the power button on the docking station and press it to turn off the device.
This will ensure that the docking station is completely powered off before proceeding with the reset process.
When you want to reset the Dell D6000 Docking Station, start by unplugging the power cable to power off the docking station. This is an essential step as it ensures that the docking station is completely disconnected from the power source.
To do this, locate the power cable connected to the docking station and firmly pull it out from the power outlet. Make sure to disconnect the cable from both the docking station and the power source.
By unplugging the power cable, you’re effectively cutting off the power supply to the docking station, allowing it to reset and clear any potential issues.
Once the power cable is unplugged, you can proceed with the next steps to reset the Dell D6000 Docking Station.
To power off the Dell D6000 Docking Station, simply press the power button. This will initiate the shutdown process and turn off the docking station completely.
Here are a few important things to keep in mind when pressing the power button:
Make sure all connected devices are disconnected and safely removed before powering off the docking station.
Wait for any ongoing data transfers or operations to complete before pressing the power button to avoid data loss or system errors.
Don’t force the power button or use excessive pressure when pressing it. A gentle press should be sufficient to initiate the shutdown process.
If the docking station doesn’t power off after pressing the power button, try holding it down for a few seconds to force a shutdown.
Remember to follow these steps carefully to ensure a proper shutdown of the Dell D6000 Docking Station.
To troubleshoot common issues with your Dell D6000 Docking Station, you may need to reset it. Resetting the docking station can help resolve connectivity problems and other issues.
Fortunately, you can reset the docking station without power cycling, saving you time and effort.
If you’re experiencing issues with your Dell D6000 Docking Station, you can easily reset it to resolve common problems. Follow these steps to troubleshoot common issues:
Resetting the docking station can help resolve issues like connectivity problems, unrecognized devices, or audio and video glitches. It clears any temporary glitches or conflicts that may be causing the problems.
If the issues persist after resetting the docking station, you may need to try other troubleshooting steps or contact Dell support for further assistance.
Disconnect all devices connected to the docking station and proceed with resetting the Dell D6000 Docking Station without power cycling. To reset the docking station without power cycling, follow these steps:
| Steps | Instructions |
|---|---|
| Step 1 | Disconnect all devices, including the power adapter, from the docking station. |
| Step 2 | Locate the reset button on the back of the docking station. |
| Step 3 | Use a small pin or paperclip to press and hold the reset button for 10 seconds. |
| Step 4 | Release the reset button and wait for the docking station to restart. |
Resetting the docking station without power cycling can help resolve various issues such as connectivity problems or device recognition errors. Remember to reconnect all devices after the reset process is complete.
To update the firmware of your Dell D6000 docking station, follow these steps:
Connect the docking station to your computer using the USB cable.
Open a web browser and go to the Dell Support website.
Enter the service tag or model number of your docking station to find the relevant drivers and firmware updates.
Download the latest firmware update for your docking station and save it to your computer.
Once you have downloaded the firmware update, you can proceed with updating the firmware of your Dell D6000 docking station. It’s important to keep your docking station’s firmware up to date to ensure compatibility with your computer and to take advantage of any new features or improvements.
Updating the firmware of your docking station can help resolve any issues you may be experiencing, such as compatibility problems or performance issues. It’s recommended to check for firmware updates regularly and install them as they become available.
Plug in the power cable to turn on your Dell D6000 docking station. To power on your docking station, locate the power input port on the back of the device. Insert the power cable into the port until it’s securely connected. Ensure that the other end of the power cable is plugged into a power outlet or a surge protector.
Once the power cable is connected, press the power button on the front or side of the docking station. The power button is typically indicated by a small icon or symbol. After pressing the power button, the docking station will begin to power on. You may notice the LED indicators on the front of the docking station light up to indicate that power is being supplied. Wait for the docking station to fully power on. This process may take a few seconds.
Once the docking station is powered on, you can connect your devices and peripherals to the available ports. Remember to also connect your laptop to the docking station using the provided USB-C cable or other compatible cable. This will allow your laptop to utilize the features and connectivity options provided by the docking station.
Now that your docking station is powered on, you can easily reconnect your devices and peripherals to enjoy their functionality and convenience. Here’s how to reconnect your devices to the Dell D6000 Docking Station:
Connect your laptop: Use the USB-C cable provided with the docking station to connect your laptop to the docking station’s USB-C port. This will allow you to transfer data, charge your laptop, and connect to additional peripherals.
Connect your monitor: Use an HDMI or DisplayPort cable to connect your monitor to the docking station’s HDMI or DisplayPort port. Make sure the cable is securely plugged in on both ends to ensure a stable connection and optimal display quality.
Connect your peripherals: Connect your keyboard, mouse, printer, external hard drive, or any other peripherals to the docking station’s USB ports. The Dell D6000 Docking Station offers multiple USB 3.0 ports, allowing you to connect and use multiple devices simultaneously.
Connect your network: If you need to connect to a wired network, use an Ethernet cable to connect your docking station to your router or modem. The docking station features a Gigabit Ethernet port for high-speed internet access.
To ensure proper functionality of your Dell D6000 Docking Station, test its features and connections.
Start by connecting your laptop to the docking station using the USB Type-C cable provided. Once connected, verify that the dock is receiving power by checking the LED indicator on the front panel. A solid blue light indicates that the dock is receiving power and is ready for use.
Next, test the video output by connecting a monitor to one of the available video ports on the dock, such as HDMI or DisplayPort. Ensure that the monitor is powered on and set to the correct input source. Your laptop’s display should automatically extend to the external monitor. If not, make sure that the video drivers on your laptop are up to date.
To test the USB and audio ports on the docking station, connect various devices such as a mouse, keyboard, or headphones to the available ports. Check if the devices are recognized by your laptop and functioning properly. If any issues arise, try connecting the devices directly to your laptop to determine if the problem lies with the docking station or the devices themselves.
Finally, test the network connectivity by connecting an Ethernet cable to the Ethernet port on the dock. Ensure that your laptop is connected to the internet and try accessing a website to confirm that the network connection is working correctly.
If you’re experiencing any issues with your Dell D6000 Docking Station, there are troubleshooting tips that can help you resolve them. Here are four tips to help you troubleshoot your docking station:
Check the connections: Ensure that all cables are securely connected to the docking station and your computer. Sometimes, loose connections can cause issues with the docking station’s functionality.
Update drivers: Make sure that you have the latest drivers installed for your docking station. Outdated drivers can lead to compatibility issues and cause the docking station to malfunction.
Restart your computer: Sometimes, simply restarting your computer can resolve minor issues with the docking station. Restarting allows the operating system to refresh and can help resolve any software conflicts.
Reset the docking station: If none of the above steps work, you can try resetting the docking station. To do this, disconnect all cables from the docking station, including the power adapter. Leave it disconnected for a few minutes, then reconnect all the cables and power it back on. This can help reset any internal settings and resolve any persistent issues.
Yes, you can use the Dell D6000 docking station with a non-Dell laptop.
The docking station is compatible with laptops that have a USB-C port and support DisplayPort over USB-C.
It provides multiple USB ports, an Ethernet port, audio jacks, and video outputs for connecting external monitors.
Simply connect your non-Dell laptop to the docking station using a USB-C cable, and you should be able to enjoy the additional connectivity options it offers.
To disconnect specific devices from your docking station without unplugging everything, you can simply unplug the device from the dock itself. Look for the connectors on the dock that correspond to the devices you want to disconnect, such as USB ports or display connectors.
Gently unplug the devices one by one, ensuring not to pull too hard or damage any cables.
This way, you can easily disconnect specific devices without disturbing the rest of your setup.
If the docking station doesn’t power off when you press the power button, there are a few steps you can take.
First, make sure that the power adapter is securely connected to the docking station and the power outlet.
If it is, try unplugging the power adapter from the docking station for a few seconds and then plug it back in.
If the issue persists, you may need to perform a reset on the docking station.
To update the firmware of your Dell D6000 Docking Station, follow these steps.
Ensure that your docking station is connected to your computer.
Go to the Dell website and search for the latest firmware update for the D6000 model.
Download the update and run the executable file.
Follow the on-screen instructions to complete the firmware update process.
It’s important to keep your docking station’s firmware up to date for optimal performance and compatibility with your devices.
If the docking station is still not functioning properly after following all the reset and troubleshooting steps, there are a few things you can try.
First, ensure that all the cables are securely connected.
If that doesn’t work, try connecting the docking station to a different computer to see if the issue is with your device.
If none of these steps resolve the problem, it may be necessary to contact Dell support for further assistance.
To reset the Dell D6000 docking station, follow the outlined steps to ensure compatibility.
Disconnect all devices from the docking station and power it off.
Reset the docking station by pressing and holding the reset button for a few seconds.
Next, update the firmware of the docking station to ensure it is up to date.
After updating the firmware, power on the docking station.
Reconnect all devices to the docking station.
Finally, test the functionality of the docking station to ensure that it is working properly.
These troubleshooting steps will help resolve any issues and ensure the proper functioning of the Dell D6000 docking station.