Physical Address
304 North Cardinal St.
Dorchester Center, MA 02124
Physical Address
304 North Cardinal St.
Dorchester Center, MA 02124
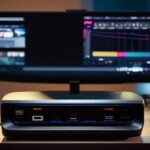
If you’re looking to remove your Lenovo laptop from its docking station, this article will guide you through the process.
You’ll learn the steps to:
We’ll also cover how to:
Follow these concise, logical instructions to successfully remove your Lenovo laptop from its docking station.
To prepare your laptop for removal from the docking station, gather the necessary tools and ensure that all connections are properly disconnected. This step is crucial to avoid any damage to your laptop or the docking station.
Start by shutting down your laptop and unplugging any external devices such as monitors, keyboards, and mice. Once your laptop is powered off and all peripherals are disconnected, locate the docking station release mechanism. This can be in the form of a latch, a button, or a lever, depending on the model of your docking station.
Before proceeding, make sure to read the user manual or manufacturer’s instructions for your specific docking station model. This will provide you with detailed information on the proper removal procedure. Once you’re familiar with the release mechanism, gently press or slide it to unlock the laptop from the docking station. Be careful not to use excessive force, as this may cause damage.
Next, lift your laptop slightly to disengage it from the docking station. Slowly and steadily, pull the laptop away from the docking station until it’s completely detached. Take care not to tilt or twist the laptop while removing it, as this can lead to unnecessary strain on the connectors.
After successfully removing your laptop from the docking station, inspect all the ports and connectors for any signs of damage or debris. If you notice any issues, it’s recommended to contact technical support for further assistance. Finally, store your laptop in a safe and secure location, taking care to protect it from any potential damage.
Before removing your Lenovo laptop from the docking station, it’s important to disconnect any external peripherals properly to avoid damage to both the peripherals and the docking station.
Start by safely ejecting any USB devices, such as flash drives or external hard drives, to prevent data corruption.
Next, disconnect any audio devices, such as speakers or headphones, by unplugging them from the appropriate ports.
Finally, detach any external monitors by disconnecting the video cables.
You should disconnect any external peripherals properly when removing your Lenovo laptop from the docking station. Proper peripheral disconnection ensures that your laptop and its peripherals aren’t damaged during the disconnection process. To achieve this, follow these steps:
Safely remove USB devices:
Save and close any files or applications that are using the USB devices.
Click on the ‘Safely Remove Hardware’ icon in the system tray.
Select the appropriate device from the list and click ‘Stop’.
Wait for the notification that it’s safe to remove the device.
Disconnect the USB device from the laptop.
Eject external storage devices:
Save and close any files or applications that are using the external storage device.
Right-click on the device in ‘File Explorer’.
Select ‘Eject’ from the context menu.
Wait for the notification that it’s safe to remove the device.
Disconnect the external storage device from the laptop.
Properly disconnecting external peripherals is crucial to avoid damaging the docking station when removing your Lenovo laptop. Before removing your laptop from the docking station, it’s important to ensure that all external devices such as monitors, keyboards, mice, and USB devices are disconnected properly. Failure to do so can result in damage to the docking station connectors or the peripherals themselves.
To disconnect external peripherals, start by saving any open files and closing all applications. Then, safely remove any USB devices by clicking on the ‘Safely Remove Hardware’ icon in the taskbar and selecting the appropriate device.
Next, disconnect any external monitors by unplugging the video cables and power cords. Finally, detach any other peripherals such as keyboards and mice by unplugging their respective cables.
To begin removing your Lenovo laptop from the docking station, start by disconnecting the power and data cables. This step is crucial to ensure a safe and smooth removal process. Follow these steps to unplug the cables properly:
Power Cable:
Locate the power cable connected to the docking station.
Gently grasp the power connector and firmly pull it out from the laptop’s power port.
Avoid yanking or twisting the cable excessively to prevent any damage to the connector or port.
Set the power cable aside in a safe place, away from any potential hazards.
Data Cables:
Identify the data cables attached to the docking station.
Check for any locks or latches securing the cables in place.
Release any locks or latches by pressing or sliding them, depending on the specific docking station model.
Once the cables are unlocked, carefully disconnect them from the laptop’s USB or HDMI ports.
Avoid applying excessive force while removing the cables to prevent any accidental damage.
To release the docking mechanism, gently manipulate the release switch or lever located on the docking station. The release switch or lever is typically located on the side or bottom of the docking station. It may be labeled with an icon or text indicating its function.
To begin, locate the release switch or lever on the docking station. It’s important to handle the switch or lever with care to avoid damaging it. Once you have located it, use your finger or a small tool to gently move the switch or lever. Apply slight pressure in the direction indicated by the arrow or text on the switch or lever.
As you manipulate the release switch or lever, you’ll feel some resistance. This is normal and is due to the mechanism securely holding the laptop in place. Continue to apply gentle pressure until you hear a click or feel the laptop start to release from the docking station.
Once the laptop is released, carefully lift it up and away from the docking station. Be sure to support the laptop with both hands to prevent it from slipping or falling.
Remember to remove any connected cables or devices from the laptop before removing it from the docking station. This will prevent any damage to the cables or devices and ensure a smooth removal process.
Gently grasp the laptop and detach it from the docking station, ensuring a secure separation. When lifting and separating the laptop from the docking station, follow these steps:
Once the laptop is lifted, check for any cables or connectors that may still be attached to the docking station. If there are any cables or connectors, gently remove them by disconnecting them from the laptop or the docking station, depending on the type of connection. Take care not to force the removal of any cables or connectors, as this may cause damage.
After all cables and connectors have been removed, carefully set the laptop down on a stable surface. Ensure that the docking station is clear of any obstructions, such as other devices or cables.
Once the laptop is securely separated from the docking station, you can proceed with your desired tasks, whether it’s using the laptop on its own or connecting it to another docking station.
Following these steps will allow you to safely lift and separate your Lenovo laptop from the docking station, minimizing the risk of damage to both the laptop and the docking station.
Before removing your Lenovo laptop from the docking station, it’s important to check for any remaining connections. Start by unplugging all cables, ensuring that no power or data connections are still attached.
Additionally, visually inspect the docking station and laptop ports for any loose or improperly connected cables. Taking these steps will help prevent any damage to your laptop or docking station when removing it.
Disconnect all cables from your Lenovo laptop docking station, making sure to check for any remaining connections. This step is crucial to ensure a smooth and safe removal process. Here are two things to keep in mind:
Unplug all cables: Start by unplugging the power cable from the docking station. Then, disconnect any additional cables such as USB, HDMI, Ethernet, and audio cables. Gently remove each cable from its respective port, ensuring not to apply excessive force.
Check for any remaining connections: After removing all visible cables, take a moment to inspect the docking station for any hidden or hard-to-see connections. Sometimes, cables can be tucked away or disguised, so it’s important to double-check. Look for any small cables or connectors that may still be attached.
To ensure a secure removal process, carefully inspect the docking station for any potential loose connections that may still be attached. It is important to check for any remaining connections as they can interfere with the removal process and potentially damage the laptop or the docking station. To assist you in this process, refer to the following table which outlines the main connections that should be checked:
| Connection Type | Location |
|---|---|
| Power cable | Back of the dock |
| USB cables | Side or back of the dock |
| Display cables | Side or back of the dock |
Inspect each connection point and ensure that they are securely attached. If you find any loose connections, gently push them in until they click into place. Once you have confirmed that all connections are secure, you can proceed with safely removing your Lenovo laptop from the docking station.
Make sure you properly stow away the docking station after removing your Lenovo laptop. Safely storing the docking station is essential to protect it from damage and ensure its longevity. Here are some important steps to follow:
Clean the docking station: Before storing the docking station, make sure to clean it properly. Use a soft cloth and mild cleaning solution to wipe away any dust or dirt that may have accumulated. This will prevent any debris from causing damage to the docking station while in storage.
Disconnect all cables: Ensure that all cables and peripherals are disconnected from the docking station. This includes power cords, USB cables, and any other connections. Carefully unplug each cable, ensuring that you don’t damage the connectors or ports.
Secure the cables: After disconnecting the cables, neatly coil them up and secure them using cable ties or Velcro straps. This will prevent them from tangling or becoming damaged during storage.
Find a suitable storage location: Choose a safe and dry location to store the docking station. Avoid areas with excessive heat, moisture, or direct sunlight, as these can cause damage to the device. Additionally, ensure that the storage area is free from any potential hazards that could potentially damage the docking station.
Protective cover: If available, use a protective cover or case to protect the docking station from dust and scratches. This will provide an extra layer of protection and keep the device in optimal condition.
After safely storing the docking station, you can now power on your Lenovo laptop. To do this, follow these simple steps:
Make sure your laptop is connected to a power source. This can be done by plugging in the power adapter to an electrical outlet and connecting the other end to the laptop’s power port.
Locate the power button on your laptop. This is usually located on the top or side of the keyboard, near the display hinge. The power button is typically marked with the universal power symbol, which is a circle with a vertical line in the middle.
Press and hold the power button for a few seconds until you see the laptop’s screen light up and the Lenovo logo appear. This indicates that the laptop is booting up.
Once the laptop has finished booting up, you will be prompted to enter your login credentials, such as your username and password. Enter this information using the keyboard and press the Enter key to log in.
Table: Common Power Button Locations on Lenovo Laptops
| Laptop Model | Power Button Location |
|---|---|
| ThinkPad X1 | Top right corner |
| Yoga 920 | Right side |
| Ideapad 330 | Top left corner |
Remember to always power off your laptop properly by clicking on the Start menu and selecting the Shut Down option. Avoid forcefully turning off the laptop by holding down the power button, as this can cause data loss and potential damage to the system.
Now that your Lenovo laptop is powered on, you can proceed to reconnecting external peripherals. It’s important to ensure that all the necessary peripherals are properly connected to your laptop for optimal functionality. Here are the steps you need to follow:
Connect the power adapter:
Ensure that the power adapter is securely plugged into the power outlet and the laptop’s power port. This will provide power to your laptop and keep it running.
Reconnect the docking station:
If you were using a docking station before removing your laptop, reconnect it now. Locate the docking station’s connector on the bottom of your laptop and align it with the docking station’s port. Gently press down until the laptop is securely attached to the docking station.
Attach the external display:
If you were using an external monitor, connect it to your laptop using the appropriate cable, such as HDMI or VGA. Make sure the cable is securely plugged into both the laptop and the monitor.
Reconnect the keyboard and mouse:
If you were using an external keyboard and mouse, connect them to your laptop’s USB ports. Ensure that the connections are tight to avoid any intermittent connectivity issues.
Plug in any other peripherals:
If you were using any other external peripherals, such as a printer, scanner, or speakers, reconnect them to your laptop as well. Follow the manufacturer’s instructions for proper connection and setup.
Now that you have removed your Lenovo laptop from the docking station, it’s important to test its functionality.
Start by diagnosing the laptop’s performance to ensure it’s running smoothly.
Troubleshoot any potential docking issues that may have occurred during the removal process.
To fully assess the functionality of your Lenovo laptop, you should perform a thorough diagnostic test. This will help you identify any potential issues and ensure that your laptop is running optimally. Here are two sub-lists to guide you through the diagnostic process:
Hardware Diagnostic:
Check the laptop’s power supply and battery health.
Test the keyboard, touchpad, and external ports to ensure they’re functioning properly.
Run a memory test to check for any RAM issues.
Verify the performance of the hard drive or SSD.
Check the display for any visual abnormalities.
Software Diagnostic:
Update your operating system and drivers to the latest versions.
Scan for malware and viruses using reputable antivirus software.
Test the performance of various software applications.
Check the laptop’s network connectivity and Wi-Fi functionality.
Evaluate the laptop’s overall performance using benchmarking tools.
To troubleshoot docking issues and test your laptop’s functionality, you can follow these steps. First, ensure that the docking station is properly connected to a power source and that the cables are securely plugged in. If the docking station has a power button, make sure it is turned on. Next, check if your laptop is receiving power from the docking station by looking for any LED indicators on the dock or laptop. If there are no indicators, try connecting the laptop directly to a power source to see if it charges. Additionally, check the connection between the laptop and docking station. Make sure the laptop is securely docked and that the connectors are clean and free of debris. If the docking issues persist, try using a different docking station or contact technical support for further assistance.
| Step | Action | Result |
|---|---|---|
| 1 | Check power connections | Ensure cables are securely plugged in and docking station power button is on |
| 2 | Verify laptop power | Look for LED indicators on dock or laptop |
| 3 | Clean connectors | Ensure connectors are clean and free of debris |
| 4 | Test with different docking station | Try using a different docking station if available |
| 5 | Contact technical support | Seek assistance if docking issues persist |
To ensure proper disconnection and test your laptop’s functionality, you can follow these steps:
Step 1: Save and close all your open files and applications.
Step 2: Eject any external devices connected to your laptop, such as USB drives or external monitors. This will prevent any data loss or damage to the devices.
Sub-step 2.1: Safely remove the external devices by clicking on the ‘Safely Remove Hardware’ icon in the system tray and selecting the appropriate device.
Sub-step 2.2: Disconnect any cables or adapters connecting the external devices to your laptop. Make sure to handle them gently to avoid any damage.
Step 3: Once all external devices are disconnected, power off your laptop. This will ensure that the docking station can be safely removed without any issues.
Step 4: Carefully detach your laptop from the docking station by sliding it upwards or following the manufacturer’s instructions.
Yes, you can remove your Lenovo laptop from the docking station without shutting it down. This is known as hot docking. Hot docking allows you to disconnect your laptop from the docking station while it’s still running.
However, it’s recommended to first close any open applications and save your work to prevent data loss. Once you have done that, you can safely remove your laptop from the docking station without shutting it down.
It is necessary to disconnect all external peripherals before removing your laptop from the docking station. This ensures that the laptop isn’t damaged and prevents any data loss.
By disconnecting the external peripherals, you reduce the risk of accidentally pulling or damaging any cables.
It’s a good practice to shut down your laptop before removing it from the docking station to avoid any potential issues.
To determine if there are any remaining connections between your laptop and the docking station, you can follow these steps.
First, check if any cables or wires are still attached to your laptop.
Then, visually inspect the docking station for any visible connections.
Additionally, you can go to your laptop’s settings and check for any active connections to the docking station.
Yes, you can store the docking station with the laptop still attached. However, it’s recommended to remove the laptop from the docking station before storing it to prevent any potential damage.
This will ensure that both the laptop and docking station are protected during storage. Simply follow the proper procedure to safely remove the laptop from the docking station, ensuring that all connections are disconnected and the laptop is securely detached before storing.
When removing your Lenovo laptop from the docking station, it’s important to reconnect the external peripherals in a specific order. This ensures proper functionality and prevents any potential issues.
Start by connecting the power adapter to your laptop, followed by any USB devices or external monitors.
Finally, connect any audio devices or other peripherals.
To remove a Lenovo laptop from a docking station, follow these steps:
By following these instructions, you can safely and efficiently remove your Lenovo laptop from its docking station.