Physical Address
304 North Cardinal St.
Dorchester Center, MA 02124
Physical Address
304 North Cardinal St.
Dorchester Center, MA 02124
Are you struggling to connect your Asus ROG to a docking station? Look no further! This guide will walk you through the process step by step, ensuring a seamless connection.
You’ll learn how to:
With clear instructions and troubleshooting tips, you’ll have your docking station up and running in no time.
Let’s get started!
To ensure compatibility between your Asus ROG and a docking station, start by checking if they were released around the same time. This is an important step because newer models of the Asus ROG may have different ports or connectors that may not be compatible with older docking stations. By checking the release dates, you can ensure that both your Asus ROG and the docking station are compatible with each other.
Next, you should also consider the specifications of your Asus ROG and the docking station. Look for any specific requirements or recommendations provided by the manufacturer. For example, some docking stations may require a certain minimum power output to support the Asus ROG’s performance. Make sure your docking station meets these requirements to ensure proper functionality.
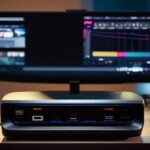
Additionally, it’s crucial to check the compatibility of the ports and connectors. The docking station should have the necessary ports to connect your Asus ROG, such as HDMI or USB-C. Verify that the docking station supports the same video and audio standards as your Asus ROG to ensure a seamless connection.
Furthermore, it’s advisable to visit the official Asus website or consult the user manual for your Asus ROG to gather information about compatible docking stations. Asus may provide a list of recommended docking stations or specific models that are known to work well with your Asus ROG.
Now that you’ve verified the compatibility of your Asus ROG with a docking station, it’s time to gather the necessary cables and accessories.
First, make sure you have the compatible cable types, such as HDMI, DisplayPort, or USB-C.
Next, set up your docking station according to the manufacturer’s instructions.
Finally, consider cable management tips to keep your setup organized and clutter-free.
Let’s get started!
Gather the necessary cables and accessories for connecting your Asus ROG to a docking station.
To ensure a successful connection, you’ll need a compatible cable type. The most common cable types used for connecting a laptop to a docking station are USB-C and Thunderbolt 3 cables. These cables provide high-speed data transfer and power delivery capabilities.
Check the specifications of your Asus ROG and the docking station to determine which cable type is compatible. Additionally, you may need other accessories such as adapters or converters if your docking station requires a different connector than your laptop.
It’s important to gather all the required cables and accessories before attempting to connect your Asus ROG to a docking station to ensure a smooth and hassle-free setup process.
You frequently need to gather the necessary cables and accessories in order to set up your docking station for connecting your Asus ROG. To ensure a smooth setup process, it is important to have all the required items ready. Here is a list of cables and accessories you will need:
| Cables | Accessories |
|---|---|
| HDMI cable | Power adapter |
| DisplayPort cable | USB hub |
| USB-C cable | Ethernet cable |
| Audio cable | Docking station manual |
Make sure you have the appropriate cables depending on your docking station’s input options and your Asus ROG’s output ports. Additionally, having a power adapter, USB hub, Ethernet cable, and audio cable will enhance the functionality of your docking station. Don’t forget to consult the docking station manual for any specific setup instructions. With all the necessary cables and accessories in hand, you are now ready to proceed with the docking station setup.
To efficiently manage your cables and accessories for connecting your Asus ROG to a docking station, it’s crucial to organize them in a neat and accessible manner.
Start by gathering all the necessary cables and accessories you’ll need for the connection. This includes the HDMI or DisplayPort cable for video output, the USB cable for data transfer, and the power cable for charging your device. Make sure to check the compatibility of these cables with your docking station and Asus ROG.
Once you have gathered the necessary cables, use cable ties or Velcro straps to keep them organized and prevent tangling. Additionally, consider using cable management solutions such as cable clips or cable sleeves to further streamline your setup.
Now it’s time to power up your docking station.
Make sure you have the appropriate power requirements for your docking station and locate the power cable that came with it.
Connect one end of the power cable to the docking station and the other end to a power outlet.
When connecting your Asus ROG to a docking station, it is important to ensure that the docking station is properly connected to a power source. This ensures that your device receives the necessary power to function optimally. Different docking stations have varying power requirements, so it is crucial to check the specifications provided by the manufacturer. To avoid any power-related issues, it is advisable to use the power adapter that comes with the docking station. This will ensure compatibility and prevent any potential damage to your device. It is also recommended to connect the docking station directly to a power outlet instead of using an extension cord or power strip to ensure a stable power supply. Remember to always follow the manufacturer’s instructions for proper power connection to avoid any unwanted complications.
| Power Requirements | ||
|---|---|---|
| Power Input | 100-240V | AC |
| Power Output | 19.5V | DC |
| Power Consumption | 90W | Max |
| Connector Type | DC-in jack | Power Adapter |
| Cable Length | 1.5m | Power Adapter |
Connect the power cable of the docking station to a power outlet using the provided adapter. Ensure that the power outlet is easily accessible and has a stable power supply. Make sure to connect the power cable securely to both the docking station and the power outlet to avoid any interruptions in power supply.
It’s important to use the provided adapter as it’s specifically designed for the docking station and will provide the correct voltage and current required for optimal performance. Avoid using any other adapters or extension cords as they may not be compatible and could potentially damage the docking station.
Once the power cable is connected, you can proceed with connecting your Asus ROG to the docking station.
To connect your Asus ROG to a docking station, begin by plugging the docking station into the appropriate port on your laptop. Here are the steps to follow:
Align and insert: Take the docking station’s connector and align it with the port on your Asus ROG. Make sure the shape and size match, and gently insert the connector into the port. You should feel a secure connection.
Check for compatibility: Before proceeding, ensure that the docking station you’re using is compatible with your Asus ROG model. Refer to the manufacturer’s documentation or website to verify compatibility. Using an incompatible docking station can lead to connectivity issues or damage.
Secure the connection: Once the docking station is plugged into your laptop, ensure that it’s securely attached. Give it a gentle tug to confirm that it’s firmly connected. If it feels loose, try reinserting it or adjusting the alignment. A secure connection ensures proper communication between your Asus ROG and the docking station.
Remember to consult the user manual or online resources specific to your docking station model for any additional instructions or troubleshooting tips. By following these steps, you can connect your Asus ROG to a docking station effortlessly and enjoy the benefits of expanded connectivity, additional ports, and enhanced productivity.
Now that you have successfully connected the docking station to your Asus ROG, it’s time to move on to the next step in setting up your workstation.
After successfully connecting your Asus ROG to a docking station, configure the display settings for optimal performance.
To begin, right-click on the desktop and select ‘Display settings’ from the menu that appears. This will open the Display settings window, where you can make adjustments to the resolution, orientation, and scaling of your connected monitors.
First, let’s focus on the resolution. By default, Windows will detect the recommended resolution for your monitors, but you can change it if desired. Simply click on the drop-down menu under ‘Resolution’ and choose the desired resolution for each monitor. Keep in mind that selecting a resolution that’s too high may strain your graphics card and result in slower performance.
Next, you can adjust the orientation of your monitors. If you have multiple monitors connected, you can choose to extend or duplicate your display. To extend the display, select ‘Extend these displays’ from the multiple display drop-down menu. If you want to duplicate your display, select ‘Duplicate these displays’ instead.
Lastly, you can adjust the scaling of your displays. Scaling determines the size of text, apps, and other items on your screen. If you find that the text or icons are too small or too large, you can change the scaling percentage by moving the slider under ‘Scale and layout’.
Once you have made all the desired adjustments, click on ‘Apply’ and then ‘OK’ to save the changes. Your Asus ROG should now be properly configured with the docking station, providing you with an optimal display experience.
To ensure proper functionality, begin by testing and troubleshooting your Asus ROG’s connection to the docking station. Follow these steps to ensure a smooth experience:
Check the physical connections:
Update drivers and firmware:
Test with a different device:
If you’re still experiencing issues after following these steps, it may be helpful to consult the user manual or contact Asus customer support for further assistance. Remember, troubleshooting can be a process of trial and error, so be patient and methodical in your approach. With a little perseverance, you’ll be able to identify and resolve any issues with your Asus ROG’s connection to the docking station.
Yes, you can use any docking station with your Asus ROG laptop. Docking stations are designed to be compatible with various laptop models, including the Asus ROG series. They provide additional ports and connectivity options, allowing you to connect multiple devices simultaneously.
Simply connect your laptop to the docking station using the appropriate cables and enjoy the convenience of a fully expanded workstation. Make sure to check the compatibility of the docking station with your specific Asus ROG model for optimal performance.
To connect your Asus ROG laptop to a docking station, you might need some special cables or accessories. The type of docking station you have will determine the specific requirements.
It’s important to check the specifications of both your laptop and the docking station to ensure compatibility. Some common accessories needed may include USB-C or Thunderbolt cables, HDMI or DisplayPort cables, and power adapters.
Follow the manufacturer’s instructions for a seamless connection.
To connect the docking station to a power source, you’ll need to locate the power adapter that came with the docking station. Plug one end of the power adapter into the docking station and the other end into a power outlet. Make sure the power outlet is functioning properly and that the docking station is receiving power.
Once connected, you can then proceed with connecting your Asus ROG to the docking station using the appropriate cables or accessories.
To connect your Asus ROG to a docking station, it’s important to follow a specific order.
First, make sure the docking station is powered off.
Then, connect the docking station to your laptop using the appropriate cable.
Next, plug in the docking station’s power adapter and turn it on.
Finally, connect any peripherals or monitors to the docking station.
This sequence will ensure a smooth and proper connection between your Asus ROG and the docking station.
If your display settings aren’t working properly after connecting the docking station, there are a few things you can try.
First, make sure that all the cables are properly connected and secure.
Then, check your computer’s display settings to ensure they’re configured correctly for the docking station.
If the issue persists, try restarting your computer and the docking station.
If none of these steps work, you may need to consult the user manual or contact customer support for further assistance.
In conclusion, connecting your Asus ROG to a docking station is a simple process that requires checking compatibility, gathering the necessary cables and accessories, connecting the docking station to power, connecting it to your Asus ROG, configuring display settings, and testing for any troubleshooting.
By following these steps, you can enjoy the benefits of using a docking station with your Asus ROG for added convenience and functionality.