Physical Address
304 North Cardinal St.
Dorchester Center, MA 02124
Physical Address
304 North Cardinal St.
Dorchester Center, MA 02124
Are you struggling to connect your Acer Predator to a docking station? Look no further! In this guide, we’ll walk you through the step-by-step process to successfully connect your laptop to a docking station.
From checking compatibility to configuring display settings, we’ve got you covered. So grab your equipment, power off your laptop, and get ready to seamlessly connect your Acer Predator to a docking station for enhanced productivity and convenience.
Let’s dive in!
Before connecting your Acer Predator to a docking station, make sure it’s compatible with the specific model of your laptop. Compatibility is crucial to ensure a smooth and seamless connection between your laptop and the docking station.
To determine compatibility, you need to consider a few key factors.
Firstly, check the ports available on your Acer Predator and compare them to the ports on the docking station. Most docking stations come with a variety of ports, including USB, HDMI, DisplayPort, and Ethernet. Ensure that the docking station has the necessary ports that align with your laptop’s requirements.
Secondly, consider the power requirements of your laptop. Some docking stations provide power delivery capabilities, allowing you to charge your laptop while it’s connected. Check if the docking station can provide sufficient power to charge your Acer Predator. Additionally, verify if the docking station supports fast charging, as this can significantly reduce charging time.
Thirdly, examine the specifications of your Acer Predator, including the operating system and graphics card. Ensure that the docking station is compatible with your laptop’s operating system, whether it’s Windows, macOS, or Linux. Additionally, check if the docking station supports the graphics card on your Acer Predator, especially if you plan on connecting multiple monitors.
Lastly, consult the user manual or the manufacturer’s website for your specific Acer Predator model. They often provide a list of compatible docking stations that have been tested and verified. This information can help you make an informed decision and avoid any potential compatibility issues.
To successfully connect your Acer Predator to a docking station, you’ll need to gather the necessary equipment.
First, you should research and choose a compatible docking station option that meets your needs.
Next, make sure you have all the required cables and connections, such as HDMI, USB, and power cables.
Once you have everything you need, you can proceed with the step-by-step setup instructions to connect your Acer Predator to the docking station.
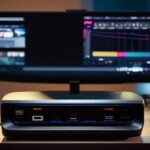
To connect your Acer Predator to a docking station, you’ll need to gather the necessary equipment. One of the first things you need to consider is the type of docking station that’s compatible with your laptop. Some popular options include the Acer USB Type-C Docking Station, the Dell Thunderbolt Dock, and the Lenovo ThinkPad Ultra Docking Station.
These docking stations offer a wide range of connectivity options, including USB ports, HDMI or DisplayPort outputs, Ethernet ports, and audio jacks. It’s important to check the specifications of your laptop and the docking station to ensure compatibility.
Additionally, you may need to purchase additional cables or adapters to connect your laptop to the docking station.
To gather the necessary equipment for connecting your Acer Predator to a docking station, you’ll need to consider the required cables and connections. Here are three items you should have:
HDMI or DisplayPort Cable: This cable is essential for transmitting high-quality video signals from your laptop to the docking station. Make sure to check the available ports on both your laptop and the docking station to determine which cable you need.
USB Cable: A USB cable is required to establish a connection between your laptop and the docking station. This cable will allow you to transfer data and connect peripherals such as keyboards and mice to the docking station.
Power Adapter: The docking station will require its own power supply, so make sure to have the appropriate power adapter to ensure proper functioning.
Gather the necessary equipment for setting up your Acer Predator with a docking station. Before you begin the setup process, make sure you have the following items on hand:
Acer Predator laptop: Ensure that your laptop is in good working condition and has all the necessary ports and connections to connect to the docking station.
Docking station: Choose a docking station that’s compatible with your Acer Predator laptop. Look for a docking station that offers the ports and features you need, such as USB, HDMI, Ethernet, and audio ports.
Cables: Depending on the docking station and your laptop’s ports, you may need various cables, such as USB-C, HDMI, and Ethernet cables. Check the specifications of your laptop and docking station to determine which cables you need.
Power adapter: Make sure you have the power adapter for your docking station. This will allow you to provide power to both your laptop and any peripherals you connect to the docking station.
To power off and disconnect your laptop, start by shutting down all programs and saving any necessary files. This will ensure that you don’t lose any unsaved work or data.
Once you have done that, follow these steps to safely power off and disconnect your Acer Predator from the docking station:
Click on the Start button in the bottom left corner of your screen and select the Power option. From the dropdown menu, choose Shut down. This will initiate the shutdown process for your laptop.
Once your laptop has completely powered off, unplug any peripheral devices that are connected to the docking station, such as external monitors, keyboards, or mice. This will prevent any accidental damage to these devices or your laptop.
Finally, gently unplug the power cable from your laptop and the docking station. Make sure to hold the plug firmly and pull it straight out to avoid any damage to the connector or the port.
By following these steps, you’ll be able to safely power off and disconnect your Acer Predator from the docking station without encountering any issues.
Remember to always save your work and close all programs before shutting down your laptop to avoid any data loss. Additionally, be careful when unplugging any peripheral devices or the power cable to prevent any damage.
Place the docking station in a convenient and accessible location near your Acer Predator laptop. It’s important to position the docking station in a way that allows for easy connection and disconnection of your laptop. Consider placing it on a stable surface such as a desk or table, ensuring that it’s within reach of your laptop’s ports.
When positioning the docking station, take into account the length of the cables that will connect to your laptop. Make sure the docking station is placed close enough to your laptop so that the cables can reach without causing strain or tension. Additionally, consider the location of other peripherals or devices that you may want to connect to the docking station, such as external monitors or keyboards.
It is also worth considering the ventilation requirements of the docking station. Ensure that it’s placed in a well-ventilated area to prevent overheating. Avoid placing the docking station in enclosed spaces or near heat sources that could potentially obstruct the airflow and cause damage to the device.
Another factor to consider when positioning the docking station is the ease of access to its ports and controls. Make sure the docking station is positioned in a way that allows for easy insertion and removal of cables. Additionally, ensure that any buttons or switches on the docking station are easily reachable and visible.
To connect the docking station to power, follow these instructions.
First, locate the power adapter that came with your docking station.
Plug one end into the docking station’s power input port and the other end into a power outlet.
Make sure the power adapter is securely connected.
This step is crucial for setting up the docking station and ensuring compatibility with your Acer Predator.
To connect your Acer Predator to a docking station, begin by plugging the docking station’s power cord into an available electrical outlet. This step is essential to ensure that the docking station has the necessary power supply to function properly.
Here are three important things to keep in mind when connecting the docking station to power:
Check the power requirements: Before plugging in the docking station, make sure to check the power requirements of both your Acer Predator and the docking station. Ensure that the power output of the electrical outlet matches the power input required by the docking station.
Use a surge protector: To protect your Acer Predator and the docking station from power surges or electrical fluctuations, it’s advisable to use a surge protector. This will help prevent any potential damage caused by sudden voltage spikes.
Ensure a stable power source: It’s crucial to connect the docking station to a stable power source. Avoid using extension cords or power strips that may not provide a stable power supply. Additionally, make sure the electrical outlet isn’t overloaded with other devices to ensure a consistent power flow.
To connect the docking station to power, follow these steps:
To ensure compatibility between your Acer Predator and the docking station, you’ll need to connect the docking station to a power source. This step is crucial for the successful connection and operation of your devices. Here are three key points to consider:
Check the power requirements: Before connecting the docking station to power, ensure that it’s compatible with the power supply in your region. The docking station should have a power input that matches the voltage and frequency of your local power grid.
Use the correct power adapter: Make sure to use the power adapter that came with the docking station or a compatible one. Using an incorrect or incompatible power adapter may cause damage to the docking station or your Acer Predator.
Secure power connection: Ensure that the power cable is securely connected to both the docking station and the power source. Loose connections can lead to intermittent power supply or device malfunctions.
Following these steps will help establish a stable power connection between your Acer Predator and the docking station, ensuring optimal performance and compatibility.
To connect your Acer Predator to a docking station, simply plug in the docking station’s power cable and connect it to your laptop using the provided USB-C cable. The docking station serves as a central hub that allows you to connect multiple peripherals and accessories to your laptop, expanding its functionality. It provides additional ports, such as USB ports, HDMI ports, Ethernet ports, and audio jacks, which can be used to connect external devices like monitors, keyboards, mice, printers, and speakers.
First, locate the power cable that came with your docking station. Plug one end of the power cable into the docking station, and the other end into a power outlet. Ensure that the power cable is securely connected to both the docking station and the power outlet.
Next, locate the USB-C cable that came with your docking station. Connect one end of the USB-C cable to the USB-C port on the docking station, and the other end to the USB-C port on your Acer Predator. Make sure the cable is firmly inserted into both ports to establish a stable connection.
Once the docking station is connected to your laptop, you can start connecting your peripherals and accessories to the available ports on the docking station. Simply plug in the desired devices into the corresponding ports, and they should be recognized and ready to use by your Acer Predator.
The docking station provides a convenient way to connect and disconnect multiple devices from your laptop with ease. It eliminates the hassle of plugging and unplugging individual cables every time you want to use a different peripheral. With the docking station, you can quickly switch between different setups and maximize your productivity.
Power on your laptop and adjust the display settings.
Follow these steps to ensure a seamless connection between your Acer Predator and the docking station:
Power on your laptop: Press the power button located on the Acer Predator laptop to turn it on. Wait for the operating system to load and ensure that the laptop is fully booted up before proceeding to the next step.
Connect the docking station: Once your laptop is powered on, connect the docking station to your laptop using the appropriate cables. Make sure the connections are secure and properly inserted.
Configure display settings: After connecting the docking station, it’s time to configure the display settings. Go to the ‘Display Settings’ on your laptop. This can usually be done by right-clicking on the desktop and selecting ‘Display Settings’ from the menu. Here, you can adjust the resolution, screen orientation, and other display-related settings according to your preferences.
By following these steps, you can ensure that your Acer Predator laptop is successfully connected to the docking station and that the display settings are properly configured. This will allow you to enjoy a larger screen, enhanced productivity, and a more seamless computing experience.
Remember to check for any software updates or driver installations that may be necessary for optimal performance.
To ensure a seamless connection between your Acer Predator and the docking station, it is important to test the connection and troubleshoot if necessary. This step will help you identify any potential issues and find solutions to ensure a smooth user experience. Here are some steps you can follow to test the connection and troubleshoot if needed:
Check physical connections: Ensure that all cables are securely connected to both your Acer Predator and the docking station. Make sure the power adapter is plugged in and the dock is receiving power.
Verify display output: Use the display settings on your Acer Predator to confirm that the external monitor or monitors connected to the docking station are recognized. Adjust the display settings as needed for optimal performance.
Test USB and other peripheral connections: Connect any USB devices or other peripherals to the docking station and check if they are detected by your Acer Predator. Test their functionality to ensure they are working properly.
Troubleshoot audio issues: If you encounter any audio problems, check the audio settings on your Acer Predator. Ensure that the correct audio output device is selected and the volume is not muted or too low.
| Issue | Possible Solution |
|---|---|
| No display on external monitor | Check cable connections and ensure the external monitor is powered on. Adjust display settings on your Acer Predator. |
| USB devices not recognized | Verify cable connections and check device compatibility. Update drivers if necessary. |
| Audio not working | Check audio settings on your Acer Predator. Ensure the correct audio output device is selected and the volume is not muted. |
Yes, you can connect multiple monitors to the docking station.
This allows you to expand your display and increase productivity.
By connecting your Acer Predator to the docking station, you can easily connect multiple monitors using the available ports.
Simply plug in the monitors to the docking station and configure your display settings on your computer.
This will provide you with a seamless multi-monitor setup for all your work and entertainment needs.
To determine if your docking station is compatible with your specific model of Acer Predator, you need to check the specifications of both the docking station and your laptop.
Look for the available ports on the docking station and compare them to the ports on your Acer Predator. Ensure that the docking station supports the same video output and power requirements as your laptop.
Additionally, consider any software or driver compatibility requirements mentioned by the manufacturer.
Yes, you can connect other devices, such as a keyboard or mouse, to the docking station. This is one of the benefits of using a docking station with your Acer Predator.
If your Acer Predator doesn’t have a compatible port for the docking station, don’t worry. There are still options available for you.
You can use a USB-C to HDMI or DisplayPort adapter to connect your laptop to an external monitor. Additionally, you can use USB ports on your laptop to connect other devices like a keyboard or mouse. Just make sure to check the compatibility of the adapter and the devices you want to connect.
To properly disconnect the docking station from your Acer Predator, make sure to follow these steps.
First, close any open applications and save your work.
Then, safely eject any external devices connected to the docking station.
Next, locate the disconnect button or switch on the docking station and press it to release the connection.
In conclusion, connecting your Acer Predator to a docking station is a relatively simple process that can greatly enhance your productivity and convenience.
By following the steps outlined in this article, you can ensure a successful connection and enjoy the benefits of having a larger display and expanded connectivity options for your laptop.
If any issues arise, be sure to troubleshoot and seek assistance if needed.
Happy docking!